Guitarists use another variation of chord tone targeting by visualising chord shapes on the fretboard particularly when triads are used. Let us call this technique ‘Shape Targeting’ for lack of a better description. These chord shapes are merely collections of chord tones therefore landing on any one of them will work. As this approach is less specific in terms of the chord tone being targetted, it does offer greater options for the player. Naturally, these use of shapes are often combined with scales to connect the individual chord tones therein.
The general steps are:
- Analysis of Chord Progression
- Identifying the shapes on the fretboard location
- Determining the change sequence
- Identifying the underlying scale shape at the fretboard location
The Shape Targeting Thought Process
Let us take the I-IV-V progression in C major as an example.
Step 1: Analysis of the actual chords used in the progression
The chords used would be the C, F and G triads and in that order. It is also useful to determine where on the fretboard we will be playing. For this example, we will be playing around the 5th to 8th frets.

Step 2: Identifying the shapes
Once we have determined the fretboard location, we will figure out the corresponding triad shapes at that location and if necessary, adapt them to improv-friendly shapes. Let us just focus on the top 3 strings first. Below are the chord shapes of C, F and G over the 5th to 8th fret region of the fretboard. You would notice that the underlying scale box is shown in translucent.
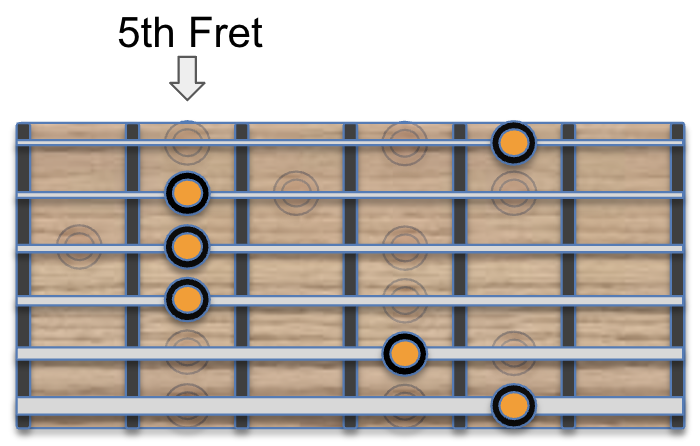
C chord @5th fret
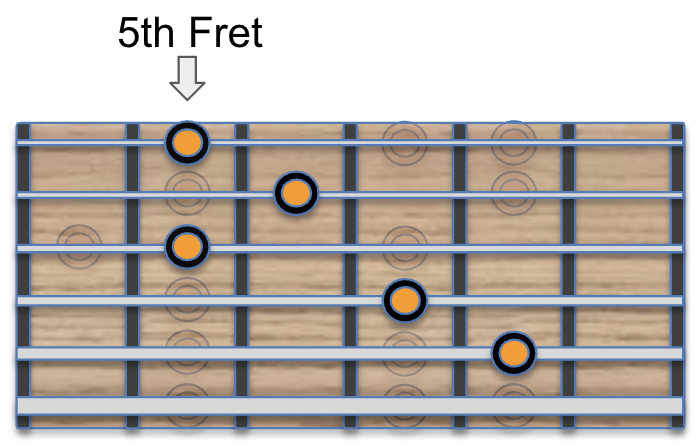
F chord @5th fret
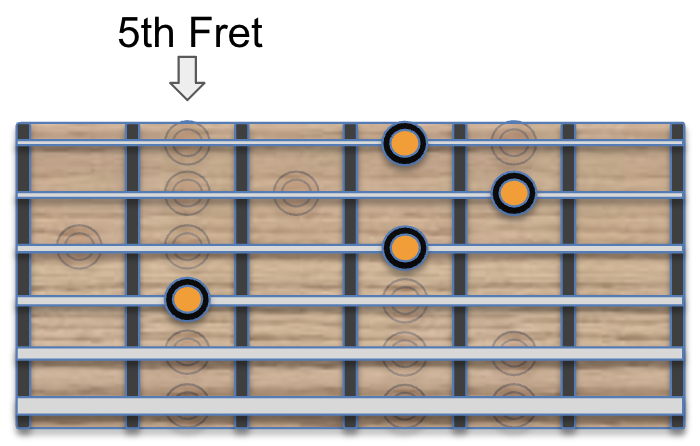
G chord @5th fret
The above structures are chord shapes and all the notes are meant to be played simultaneously. This will not work optimally for chord tone soloing as soling usually involves playing individual notes. As such we will need to amend these chord shapes into chord tone shapes. Focusing on just the top 3 strings, we will notice that some chord tones are omitted in order to play the chord shapes. These are shown in red.

C chord tones @5th fret
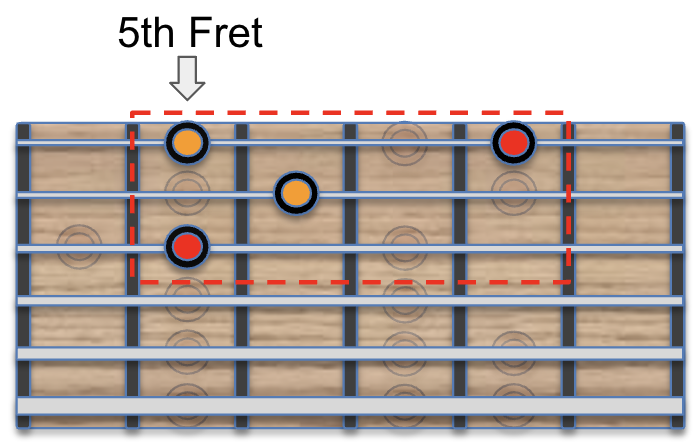
F chord tones @5th fret

G chord tones @5th fret
These chord tones were omitted in the CAGED shapes in order to keep only one note per string. A chord on guitar can only be played when there is only one note on each string. Notwithstanding, we have deconstructed the chord tone shapes of the C, F and G chords as shown below and these are the shapes we want and in this sequence.
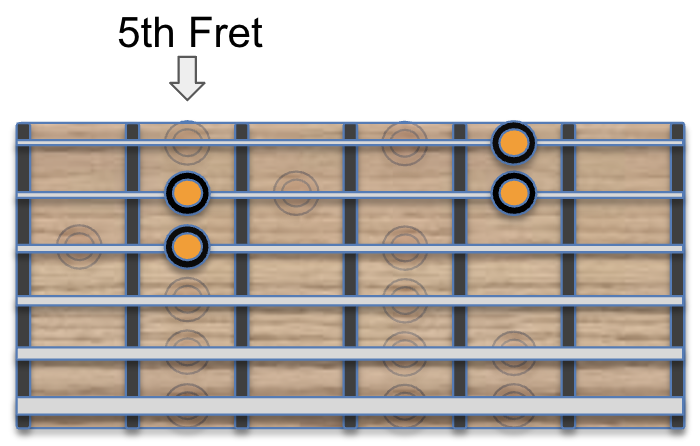
C chord tones @5th fret
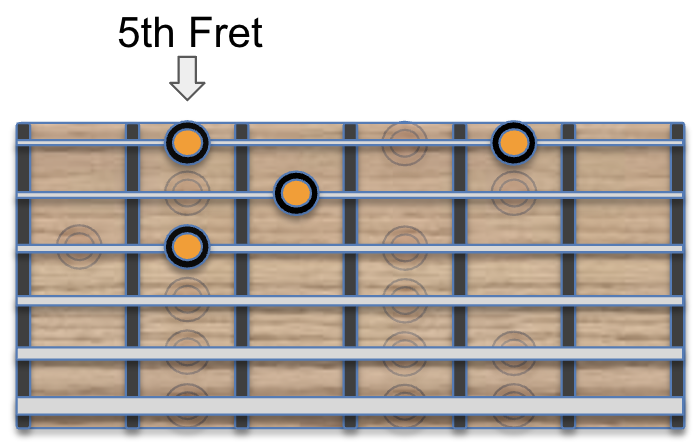
F chord tones @5th fret
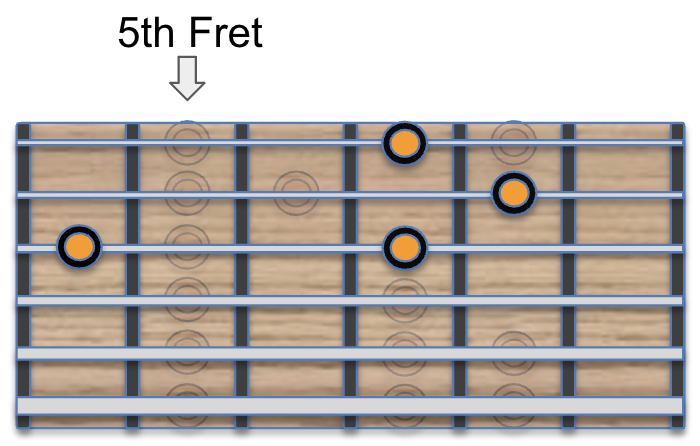
G chord tones @5th fret
Note that the chord tone shapes now have 2 notes on one of the strings. This will facilitate the chord tone soloing. If you look even closer, you would notice that the 2 not groups alternate between the lowest of the 3 string in this case the 3rd string, then it is on the top string (1st string) and then it is on the middle (2nd string). This is significant for those players interested in hybrid and legato picking.
Step 3: Determining the Change Sequence
The above shapes represent the notes of the chords in the I-IV-V progression. Any one of these notes can be targeted or landed on over the chord. Not only that, if we played these notes specifically, we would then be playing only the chord tones and not any tension or avoid note of the underlying chord. The key learning point is to know how these shapes change in the chord sequence so that we can target them accordingly.
The difference between note targeting and shape targeting is that the former focuses on the first note you land on in the chord change. Thereafter, you can play any of the other notes in the appropriate chord scale you choose. Shape targeting however, emphasises purely chord tones even after landing on the first beat of the chord change. This way your lines are purely chord tones.
Step 4: Identifying the Underlying Scale Box
Essentially, this step connects the chord tones by filling the spaces in between with notes from the key we are playing in. These in-between notes are the tensions which we should not land on but used as passing notes. In this example the underlying scale box is shown above albeit transparent.
These are the general steps we would take for one ‘box’ and can be repeated for the other 4 boxes. An individual player may take these steps consciously and purposefully or he may be doing it instinctively depending on his level of proficiency on the instrument.
Higher Order Processes in Shape Targeting
The above process covers the basic methodology for this approach but more season players might have addition steps that they may apply. These include:
Melodic Approach
This step involves thinking of how to shape the line as we approach the target note for instance using an enclosure particularly if we want a jazz element in the line. Perhaps we might want to land on the note from an adjacent scale tone just to keep it simple. Alternatively we might want to superimpose our favourite lick but to end it by landing on the target note we’ve identified for instance.
Melodic Contour
This step might include developing lines that move around in terms of pitch and contour. Perhaps we might want to develop our solo from the ground up, gradually build intensity, and culminate in a climax somewhere towards the end.
Connecting the Boxes
Sometimes called ‘breaking out-of-the-box’, this step is a natural evolution of the learning on the guitar. It involves connecting lines which are played on different scale boxes in order to play from the lowest registers of the guitar right up to the highest frets. Simply put, it means not playing at only one location on the fretboard. There is nothing wrong with playing in a box and this is a natural part of learning the guitar. However, as we progress, we should not restrict ourselves to only one box but develop proficiency in all the scale boxes, all over the fretboard. This mastery requires applying all the above steps to each of the different boxes at different areas of the neck.
The next level of chord tone soloing is what I call “Guide Tone Targeting”.
Like us on Facebook and follow us on Instagram to be kept notified of the latest content in chord tone soloing.
